In our previous article, we introduced you the Docker Compose YAML file. Today, we’re going to focus on the compose command line. In order to better understand this topic, you’ll need to be familiar with images and containers along with how to use them and the concepts. this is so that you can use all of this information while in the compose command and the YAML file.
 For the recall of a Docker Image:
In Docker, everything is based on Images. An image is a combination of a file system and parameters. Let’s take an example of the following command in Docker.
For the recall of a Docker Image:
In Docker, everything is based on Images. An image is a combination of a file system and parameters. Let’s take an example of the following command in Docker.
For the recall of a Docker Image:
In Docker, everything is based on Images. An image is a combination of a file system and parameters. Let’s take an example of the following command in Docker.
And Docker Containers:
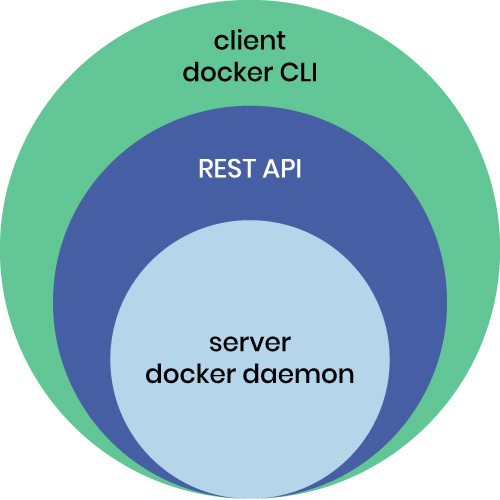
Containers are instances of Docker images that can be run using the Docker run command. The basic purpose of Docker is to run containers. Let’s discuss how to work with containers. The Docker Compose command line tool (CLI) is actually separate from the Docker tool. It’s actually a separate binary. So if you’re on Docker for Windows or Docker for Mac, it actually comes bundled with that. But if you’re on Linux, you have to download it separately and you can get that at their github repo, the installation process is described clearly enough for you to understand.Two common commands that we use will be:
- docker compose up: This is by far probably what you’re going to be typing 90% of the time. Technically, it’s alright but it’s a powerful single command in order to do everything in the compose file, including creating volumes, creating networks, starting all the containers with all their configuration options.
- docker compose down: This command is used to clean up everything else when you’re done, which a lot of people actually forget to do. It’ll get rid of the containers, remove the networks and volumes that aren’t needed anymore.
❯ git clone github.com/your-team/blahblah
❯ docker-compose up
Let’s dive into an example:
version: '3'
services:
 proxy:
   image: nginx:1.13 # this will use the latest version of 1.13.x
   ports:
     - '80:80' # expose 80 on host and sent to 80 in container
   volumes:
     - ./nginx.conf:/etc/nginx/conf.d/default.conf:ro
 web:
   image: httpd  # this will use httpd:latest
In the volume command, there’s a bind mount to a file in this directory called an Nginx config file. It is used to map that file into the container. At the end, ‘ro’ (read-only), means that we can’t change it in the container. That’s not necessarily required here but we just wanted to show you that’s how you would write this up in this case. In this example above, we have two services (or two containers). In this case, the first one is an Nginx server which is configured as a proxy. And that’s going to be listening on my port 80 on my local machine. When you type this docker-compose up command, it should start up both containers. It should create a private network for the two of them. In addition, it will automatically bind mount that file, open up the port, and it will start dumping logs out to your screen. In the Compose file, we didn’t specify a network area, or a volume area because they’re not actually required. They’re only necessary if we need to do more custom things in the network, like maybe change the default IP addresses or change the network driver that’s used. In the volume’s case, we can create named volumes, or use a different volume driver. This is now our Apache server and our Nginx server. A great feature of Compose that you don’t necessarily get directly out-of-the-box with Docker is that it will log all the containers that it’s running on the screen in the foreground. We can always do the same thing as we do with Docker and run Docker Compose up -d, which will run in the background but it’s nice to see when we’re developing or testing things locally, that we’ve got our logs right on the screen. If you want to stop, you can hit Ctrl+C to stop the Compose in the screen. You could also run it again with the -d to run it in the background. When you do so, you can run this command: docker-compose logs to see the same output of logs when you need. A lot of the commands that you might be used to in Docker are also used in Docker Compose. What Compose is doing is it’s talking to the Docker API in the background on behalf of the Docker CLI. It’s kind of like a replacement for the Docker CLI still talking to the Docker server API in the backend, like the image we attached at the top of this blog post. When you need help, you can run: docker-compose help. It shows all the commands you can run. You’ll see a lot of these look really familiar because they’re the equivalent of the Docker command but in this case they’re using the context of the configuration of the compose file. You can use a docker-compose ps here, which will show that both of the containers are up and running. You can also use a docker-compose top to actually list all of the services running inside of them in a nice formatted output. Finally, we can use docker-compose down to stop and clean up all the files. By using the Docker Compose files, we can deploy complex environments with a simple YAML file. Another aspect that Compose can perform efficiently for you is its ability to build your images at runtime. It’ll actually look in the cache for images and if it has the “build” options in it, it will build that image when you use the up command. It won’t build the image every single time but it will build it if it doesn’t exist. You’ll need to either use the docker-compose build command to rebuild your images if you change them, or you can use docker-compose up –build. Let’s switch things up a bit. In the same directory, we have a Dockerfile called nginx. Dockerfile:
FROM nginx:1.13
COPY nginx.conf /etc/nginx/conf.d/default.conf
Then a nginx.conf:
server {
    listen 80;
    location / {
        proxy_pass         http://web;
        proxy_redirect     off;
        proxy_set_header   Host $host;
        proxy_set_header   X-Real-IP $remote_addr;
        proxy_set_header   X-Forwarded-For $proxy_add_x_forwarded_for;
        proxy_set_header   X-Forwarded-Host $server_name;
    }
}
And finally the Docker Compose:
version: '2'
services:
  proxy:
    build:
      context: .
      dockerfile: nginx.Dockerfile
    ports:
      - '80:80'
  web:
    image: httpd
    volumes:
      - ./html:/usr/local/apache2/htdocs/
As you can see above, this is divided into two services. One is the Nginx proxy like before, and one is the Apache web server like before.
The difference between the two is that instead of us specifying the default image for Nginx, we’re actually building a custom one. You can see here that we’ve actually given it some arguments where we’re telling it that the Dockerfile it needs to use is a specially named Dockerfile. We want it to build that Dockerfile in this current directory that it’s in. We want it to name that image when it builds a custom Nginx. It’s going to store that in our local cache. As you can see above, this is divided into two services. One is the Nginx proxy like before, and one is the Apache web server like before.
Down at the bottom, we have a web server running Apache. What we’ve done here is we’ve actually mounted some HTML source files that we had into the Apache server. We’re going to be editing it locally, but when we go to production with this, it’s actually going to be sitting behind an Nginx proxy. We want to emulate that production environment as much as possible in its local setting. In this case, we want this Nginx, and we know that this Nginx config is the one we’re going to use on the production server, so that’s why we’ll use that one here.
When we run the Docker Compose up command, it’s going to first check for the name of this image in the cache. If it doesn’t find it, then it’s going to use these build commands here to look up the Dockerfile and then build an image. You can see from this Dockerfile.
We don’t really need to be changing this proxy config, so we don’t need to mount it so that we can change it all the time. In the future, if we need to change that image, we would need to use the docker compose build or the docker compose up –build commands.
After building the image, it will create the containers and start the web server and proxy server as well. You’ll be able to see all of the information in the log console. You can see in our Docker Compose that we declared the volumes mounting, meaning that you can edit your files and get it updated in real time without having to rebuild the image.
This was an example of how you can build custom images locally. This tutorial also covered how you’ll be able to mount some files into your application so that you can edit them at runtime. And, of course, if this needs to be a database-backed application, we would just add a third service for the database server.